
Lakshmi's Cookbook Videos

Pavakkai Pitlai (Bitter gourd Pitlai)


New post after 3 weeks! Due to personal commitments, couldn’t post anything. Thanks to all those loving hearts who asked about my next post
I have returned with a traditional recipe- Pavakkai Pitlai. PK Pal, one of my followers in Facebook requested me for a satvik recipe. This one is for you sir! This is a no onion, no garlic recipe, and is full of protein rich pulses. I have added only three pulses, but you can add as many as you want. The more, the better. Bitter gourd was a big NO for me until recently. My kids followed suit. We started eating bitter gourd only after Priya, my friend, gave me the recipe for this dish. This is Priya’s mother, Rukmini amma’s recipe. Pavakkai Pitlai is a great way to bring the much hated bitter gourd into your plate. Whenever my twins eat this, they know that there is something new, but they are far from guessing that it is bitter gourd 😂

This dish is a store house of proteins, fibre, vitamins. It has a tangy taste, which masks the bitter taste of the bitter gourd. You can have it with rice, chappati or dosa. It is a dish you can have for any meal of the day, be it breakfast, lunch or dinner. Make this pavakkai pitlai and enjoy your wholesome meal! 

Preparation time: 15 minutes+overnight soaking of pulses.
Cooking time: 20 minutes
Cuisine: South Indian| Course: Sides

Ingredients:

Kabul chana(vellai sundal)- ¼ cup
Rajma: ¼ cup
Groundnut: ¼ cup
Thoor dal- a handful
Chana dal- a handful
Moong dal- a handful
Bitter gourd- 2(medium size)
Tomatoes-2
Coconut- ½ cup
Tamarind- a small lemon size
Sambar powder- 2 tblsp
Turmeric powder- ¼ tsp
Salt- as needed
Oil- 1 tblsp
Mustard seeds- ¼ tsp
Urad dal- ¼ tsp
Cumin seeds- ¼ tsp
Curry leaves- a few
Green chili- 2

Method:

1.       Take Kabul chana, rajma and groundnuts in a vessel and wash it. Soak it in water over night or atleast 6hrs.
2.       Wash the bitter gourd and cut it into pieces and keep it ready. Wash all the three pulses( thoor dal,channa dal and moong dal) and keep ready.
3.       Heat oil in a pressure pan. Add mustard seeds, urad dal and cumin seeds. When it splutters add slit green chili and curry leaves.
4.       Add thoor dal, chana dal and moong dal to the cooker. Fry well until there is slight colour change.
5.       Now add the soaked Kabul channa, rajma and groundnut to the cooker. Add turmeric powder and salt. Add appropriate water and close the lid. Cook it for 3 to 4 whistles.
6.       In the mean while add tomatoes, coconut, tamarind and sambar powder to  a mixer jar and make a smooth paste by adding a little water.
7.       Once the pressure releases, open the lid and add bitter gourd pieces and ground paste to the cooker. Check for salt and spice and add accordingly.
8.       Close the lid and cook for two more whistles. Wait for the pressure to release and open the lid. Garnish with coriander leaves. Serve hot with rice.

Notes:

·       This is a no onion and no garlic recipe.
·       There is no end to the number of pulses you can add to this dish. I have added only three but you can add a handful of as many pulses as you wish.
·       You can increase the quantity of sambar powder according to your spice levels.

Step by step pictures

 take 1/4  cup each of kabul chana, 
groundnut and rajma
 wash and soak in water over night.
 heat oil in cooker.
add mustard seeds, urad dal and cumin seeds
 add slit green chilies and curry leaves.
 now add toor dal, moong dal and chana dal.
fry well until there is slight colour change.
 now add all the three soaked pulses.
fry well.
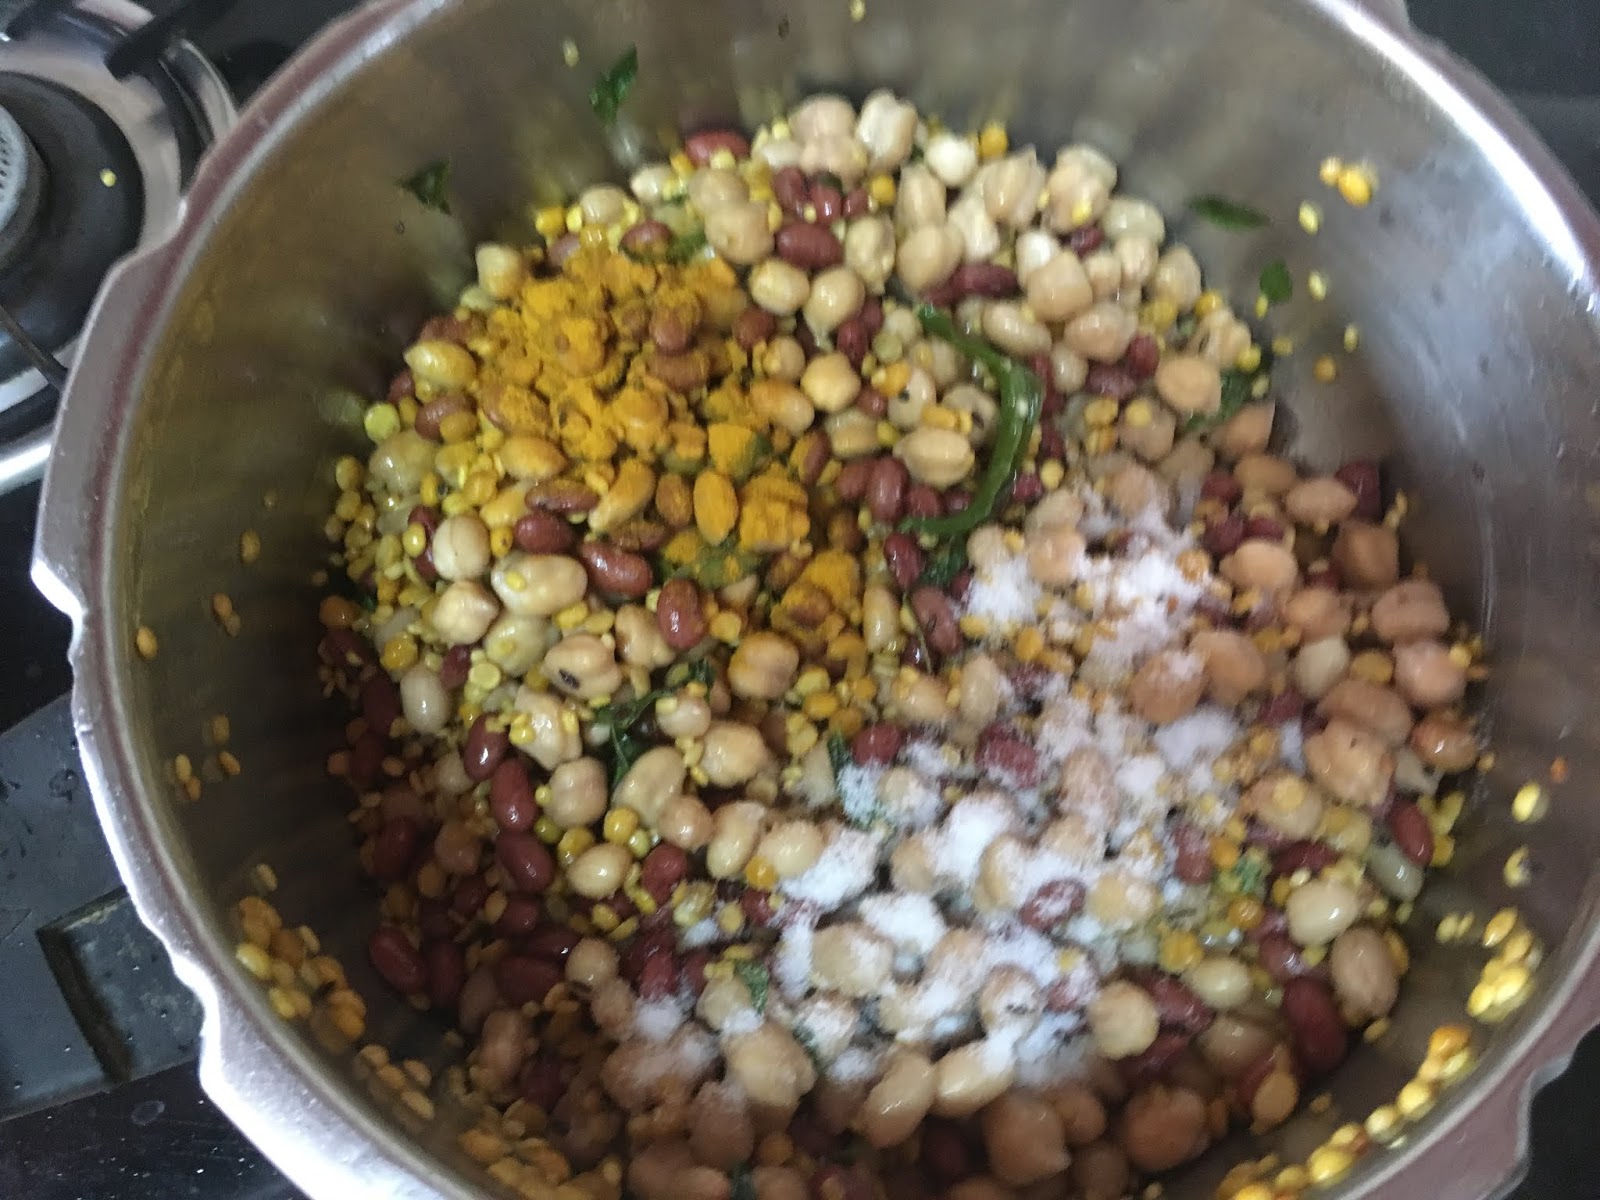
 add salt and turmeric powder.
mix well.
 add appropriate water.
 close the cooker lid and cook for three whistles.
in the mean while make a smooth paste of
tomatoes, coconut, tamarind and sambar powder.
 after the pressure releases open the lid 
and add the ground paste and cut bitter gourd pieces.
mix well and check for salt and spice
add any if necessary.
 close the lid again and cook for 2 whistles.
serve with hot rice.


Comments

Also see

Chena Pais

The last post for Diwali this year- Chena Pais! If you have been following my posts for quiet some time now, you would have discovered my great love for Bengali sweets 😍 All that creamy and melt-in-the-mouth sweets…Making me drool right now 😋! Rasmalai is my most favourite and one dish which greatly resembles it is chena pais. Most people get confused between the two. They are very alike but not same. Apart from being smaller in size, chena pais, after being added to the sweet milk are cooked for some time, unlike rasmalai. These tiny cute balls in sweetened, thickened milk are great for any milk based sweet lovers. Again, the chopped nuts and the saffron make this dish tastier. Serve chilled and enjoy!  Ingredients: Milk- 1 litre Lemon juice – from one full lemon Sugar- 1 cup Water- 1 cup Full cream milk- 1 litre Milkmaid- ½ tin (200 gms) Saffron- a pinch Cardamom powder- ¼ tsp Cashews- 6 to 8 (cut into small pieces) Pista- 6 to 8 (cut into small pieces

Egg Donne Biryani

Hey guys! Biryani gang make some noise!!  I just love it! Today’s post is DONNE BIRYANI!!! Donne biryani is a very popular biriyani type in Karnataka. There is a very very popular donne biriyani shop near home. Whenever my husband tries to buy from there, he returns empty handed 😔. Because there is always a huge crowd at that place even for takeaways.  But thanks to my friend Nandu who blogs at food fondness , I can now make donne biriyani at home! Here we use just green chili for spice. As it also has coriander, mint and kasuri methi, it has a nice green hue. It is usually served in a donne (a bowl made from ecofriendly palm leaf) and hence gets its name as donne biryani.  This dish is very easy to make yet very flavourful. Make your Sunday yummy by trying out this donne biryani, served with some raita! Ingredients: Jeera samba rice- 2 cups Eggs- 6 to 8 Onion-1 (cut vertically) Ginger- 2inch piece Garlic- 7 to 8 Green chilies- 4 to 6 (depending on your spice level)

Lychee Rabdi

       Lychee Rabdi!         How many lychee fans out here? Me and my fam absolutely love these bright red cuties. So soft and juicy, we never miss the opportunity to feast on them. As most of you know, we are great fans of sweets. Creamy milk sweets in particular. So, what happens when you put both these seemingly different foods together? We have the amazing Lychee rabdi! As unique as this sounds, lychee rabdi is truly tasty. De seeded lychees are filled with soft homemade sandesh. These stuffed lychees are dropped in thick and creamy rabdi and…voila! A yummy dish is ready! The best part is that you can taste the fresh lychees in the rabdi, giving you the best of both the worlds. This dish is partly inspired by Bliss Of Cooking . Though she had made the same with mango rabdi, we decided to stick to the good ol’ rabdi. Give this amazing fusion dessert a try and win hearts!   Preparation time: 10 to 15 minutes| Cooking time: 30 to 40 minutes Course: Dessert| Cuisine:

Paneer Pollichathu

Paneer Pollichathu! Who said banana leaves are used only as eco-friendly plates? Ever tried steaming in banana leaves?! I first came across meen pollichathu in a restaurant here in banagalore. Then, when scrolling through Instagram one day, I came across paneer pollichathu made by Kalpana who blogs at Life with Spices . I am a big fan of her paneer recipes and that is one of the main reasons why I started following her 😊. The recipe seemed so interesting that I immediately bookmarked it. And here is my try! Paneer pollichathu is nothing but masala coated paneer block steamed in banana leaf. I must say, the main star in this recipe is not the paneer but the banana leaf. It gives the dish a new taste and a fresh flavor…. definitely gonna try more similar recipes! So, when are you trying out this unique recipe? Preparation time: 30 minutes| Cooking time: 10 to 15 minutes Course: Sides/Starters |Cuisine: Indian Ingredients: Paneer- 200 gms Marinade for paneer: Kas

Beetroot Kola (Fried beetroot balls)

A peaceful evening. A steaming cup of tea in one hand and your favorite magazine in the other. The only thing that can make it better is a crispy snack. And what better snack than Fried Beetroot Balls? The bright colour of the beetroot is an eye-catcher and even the kids who do not like beetroot will ask for one more serving. This is one of the dishes which needs very little ingredients and effort to make and still tastes great. This dish is at its best when deep fried, but health freaks can try making patties and shallow fry on tawa. But I cannot guarantee you the taste, as I haven’t tried shallow frying. This recipe was shared by my friend, Mangai, in our school whatsapp group Kitchen galata. But the credit actually goes to Mangai’s mother-in-law, Vasantha amma who taught her this recipe.Thanks Vasantha amma. This dish is best paired with tomato ketchup and your favorite magazine.  Enjoy your tea time with these crispy fried beetroot balls.   Preparation time:10 min|

Gulab Jamun Waffle

One fine day, while scrolling through insta, I came across a giveaway contest by  one of the fellow instagramers  . The challenge went something like this- An Indian traditional dessert with a twist. And I went WOW! It sounded like a very interesting challenge. So Tharu and I got thinking about something unique when she came up with GULAB JAMUN WAFFLES. This dish is actually based on the legendary Gulab Jamun and Vanilla Ice cream combo. So here’s the twist- instead of Gulab Jamun, we have waffles. The waffles are made out of readymade Jamun mix. They are crispy on the outside and soft in the inside. The waffles are coated with sugar syrup and topped with a scoop of vanilla ice cream and a whole lot of chopped nuts. This was a very unique dish and a super hit with my kids.  And I must say, it tastes divinely.  I would like to thank my sweet neighbour Sweta Rao for lending me her waffle maker. After the success of this dish, we have started to believe that we too can be re

Death By Chocolate (with vanilla ice cream)

*WARNING- extra chocolaty dish ahead* So, this is my hundredth Instagram post! 💃 It should be special na? To celebrate, I have made a divine dessert- Death By Chocolate! This is a super sweet dish, with alternating layers of chocolate brownie , vanilla ice cream, topped with yummy chocolate sauce and some crunchy peanuts. When I was first introduced to this dish, it was totally an alien dish to me. But once I tasted it, one thing became clear- this dish surely kills you with sweetness. The perfect dish for anyone with sweet teeth. 😉 You can surely order this dish, but making it at home is also not that hard. I have used homemade ice cream, homemade brownie and Hershey’s chocolate syrup along with some roasted peanuts to complete the dish. When you make the vanilla ice cream at home, you can enjoy a guilt free dessert, as we are not using any preservatives in the ice cream. Best eaten chill, with every scoop, you can treat yourself to the heavenly combination of brownie

Kodo Millet Salad

Millets in may series post 4- Millet Salad I am not a big fan of salads. But this millet salad just won my heart. This recipe is from the Sahaja millet based calender, from where I collected few recipes for the series. All the fresh pomegranate, corn, carrot and sprouts, together with the tempering just makes the perfect salad. The coconut adds a fresh twist and the lemon adds a tangy twist to the salad. This colorful bowl of goodness is a complete, nutritious meal in itself. Or you can even serve at as a starter. Surely, kids will love this salad, with their favourite corn and pomegranate. An amazing way to include millets and sprouts in your diet. Give this wholesome salad a try today! Health benefits of Kodo Millet- It contains a lot of fiber; hence it is useful for diabetic people. It is very easy to digest and helps in weight reduction. It is excellent for strengthening the nervous system. Controls high blood pressure and keeps a check on cholesterol level. It is gluten

Millet Samosa

Millets in may series post 8- Millet samosa One of my favourite snacks made healthier- millet samosa! When I first came across this recipe in the Sahaja calendar, I knew it had to be in the series. The millet here is in the form of flour. I have used sorghum flour. You won’t have any idea where the millets went. I must admit, this is not the healthiest millet dish. This recipe also calls for a little maida, without which the samosas are impossible to make (trust me, I tried). Also, we are frying them. But something is better than nothing, na? This is a classic samosa, with the all favourite potato and peas filling. I was really hesitant to make these, but turns out, they are not that hard to make. Just a few simple folds and you have garma garam samosa ready to eat. Grab some chutney and enjoy your tea time with some lip-smacking millet samosa! Health benefits of Sorghum- it is highly nutritious and rich in potassium, phosphorus, calcium, iron, zinc and sodium. It is a po